|
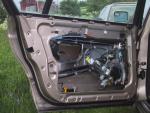
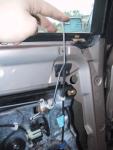
The only required tools are 8mm hex socket and a large flat screwdriver or other prying tool, preferably of plastic or wood to avoid paint damage. Also a 9mm hex socket is required to remove the outside door protection strip. Removal of outside protection strip Open door and unscrew black plastic nut using a 9mm hex socket. Carefully pry the protection strip slightly outwards and push it forward to release it from the front clip. Assembly is reverse. Take care not to overtighten nut. Removal of inside door trim Pry out the wood trims from each side of the door using a large screwdriver or prying tool. Two clips holds the rear one, and one the front one. After uncliping simply draw them out. Unscrew the two 8mm hex bolts on each side of the doorhandle. Now only 12 green plastic clips hold the trim onto the door. Carefully unclip these using the same prying tool. See photo for locations. Afterwords the trim is held in place by 6 metal clips under the window cromelist. Lift up and unhook from these clips. Now the trim is loose and you will want to unhook the doorhandle wire from the handle (blue wire with a hook), and remove the 3 electrical connectors, the windowswitch, footwell light (black plug) and ashtray light (white plug). 
Door-opening wire (blue) arrowed.
Assembly is reverse. Take care to connect the electrical connectors. You may want to grease them up for continued uninterupted operation. Also don´t forget the doorhandle wire, and the lock-knob rod.
 Push the trim onto the 6 metalclips first, and then carefully align the green plastic tabs. Replace any broken tabs with new ones. These are important for continued noise-insulation. Bolt back in both 8mm hex bolts, and clip on the woodtrims. Check operation of all blubs and switches. Electrical Connections - Left door Device Microswitch
Windowswitch
11 279 1 379 076
Windowsensor
1 388 488 Doorsensor
Window motor
51 33 1 388 611 Footwell-light
Ashtray | Wire color Yellow/Blue
Brown
Brown
Yellow Brown
Brown
Red/White
Brown/Red Brown
Grey/Black | Plug color Black
1 378 404
Grey
1 378 418 Yellow
1 378 419
Black
1 378 400 White
1 378 401 | Harness color Brown/White
Brown/Black Brown/Yellow
Grey/Violett
Grey/Red
Grey/White Blue/Violett
Brown/Black Brown/Black
Blue/Violett Blue/Violett
Black/White Red/White
Brown/Red Brown/Black
Grey/Black | Plug color Black
1 378 300 Black
1 378 125
Grey
1 378 406 Yellow
1 378 409 Grey
1 378 402 Black
1 378 404 White
1 378 405 | Function Fully up/down
sensorloop
Ground
Up/Down
Illumination
Down/Up Alarmloop
w/white dots Alarmloop
Windowmotor
powerlines +B
Ground via door Ground
+B via lightsw. |
Numbers are BMW partnumbers for each device and plug. Harness color referes to the color of the wire going into the door harness, and then the car. The Wire color referes to the color of the wire on the other side of the plugs, where available. 
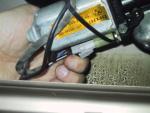
Window motor (51 33 1 388 611)
Door lock is made by Sachs, part number 51 26 1 350 179, with plug part number 1 378 147. Sachs partnumber is 009 201 490. Windowswitches are made by Kirsten, Germany. No partnumber. The correct plugs for these are made by Amp, with partnumber 1-927 486-1. Electrical windowmotors are made by Brose, partnumber 680.185346-000. Electrical Connections - Right door Device Microswitch
Windowswitch
11 279 1 379 076
Windowsensor
1 388 488 Doorsensor
Window motor
51 33 1 388 611 Footwell-light
Ashtray | Wire color Yellow/Blue
Brown
Brown
Yellow Brown
Brown
Red/White
Brown/Red Brown
Grey/Black | Plug color Black
1 378 404
Grey
1 378 418 Yellow
1 378 419
Black
1 378 400 White
1 378 401 | Harness color Brown/White
Brown/Black Brown/Yellow
Grey/Violett
Grey/Red
Grey/White Blue/Violett
Brown/Black Brown/Black
Blue/Violett Blue/Violett
Black/White Red/White
Brown/Red Brown/Black
Grey/Black | Plug color Black
1 378 300 Black
1 378 125
Grey
1 378 406 Yellow
1 378 409 Grey
1 378 402 Black
1 378 404 White
1 378 405 | Function Fully up/down
sensorloop
Ground
Up/Down
Illumination
Down/Up Alarmloop
w/white dots Alarmloop
Windowmotor
powerlines +B
Ground via door Ground
+B via lightsw. |
These wires and part numbers have to be checked!! Numbers are BMW partnumbers for each device and plug. Harness color referes to the color of the wire going into the door harness, and then the car. The Wire color referes to the color of the wire on the other side of the plugs, where available.
|
 DIY articles
  7-series 86-94
  Rear Door details